![]()
Worm
Hunt!
Collecting
and Observing Earthworms
You can find earthworms in garden soil, vacant lots, lawns, parks, and pastures. Find a likely spot and use the following suggestions to dig for worms, coax them to the surface, and look closely at how they're put together!
When
to Go Hunting
The best times to look for worms are on 1) cool, moist fall days or evenings,
2) humid days before it rains, or 3) during rain showers. Fall is the best
time to sample worms because most are sexually mature and it's easier to figure
out who's who.
Bringing Up the Worms
Method
1
USDA soil scientist Dr. Dennis Linden describes one way to find worms: First,
look at the soil surface. Castings ("worm poop") are small
piles or pellets of soil, which are often mixed with some plant litter. If
you see these, earthworms should be in the area. When you've found a likely
spot for worms, dig a spadeful of soil and sort through it. Can you find any
worms? With experience, you may also find cocoons (these house the
eggs). While you are digging, always watch for evidence of large burrows with "slickened" walls.
These may indicate the presence of night crawlers: the larger, deeper-burrowing
earthworms.
Method 2
Forest ecologist Cindy Hale gives directions for a method that will bring many
of the deeper burrowing earthworms to the surface. How many different kinds
of worms can you find in your study area?
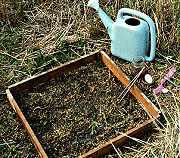 |
- Measure off a square of soil about one foot on each side for your study area. Use string or boards to make boundaries around the area.
- Dissolve 1/4 cup (about 40 grams) of ground yellow mustard seed (dry mustard powder from the spice section in the grocery store) in one gallon of water. Shake it up well. (Recipe adapted from the SCPFRC)
- Slowly pour the mustard solution over the soil inside the boundaries of your study area. Pour it so it soaks into the soil instead of running off the soil. The worms will start coming up. Don't worry; the mustard irritates their skin and makes them escape to the surface, but it does not harm the worms.
- Pick
up the worms with a forceps and put them right into a pan of fresh
tap water to rinse off the mustard solution. Now you can take them
out of the water, lay them on a wet paper towel, and use a magnifying
glass for a closer look.
Caution: The worms are "breathing" oxygen through their wet skin, so they must be kept moist at all times. You can use water misters to do this. Worms are fragile animals and can be hurt easily, so handle them very gently.
Work in pairs for this activity. Take turns writing down your observations and responses to questions (they're in italics). After observing the worms for at least ten minutes, get back together with the rest of the class and be ready to share your observations.
- Using a magnifying glass, count the rings or segments along the length of a worm's body. These segments help the worm to twist and wiggle forward or backward with the help of hair-like structures called setae (pronounced SET tay).
- Place the worm in a plastic cup or on a petri dish so you can see the underside (ventral side) or the worm. You will be able to see inside the worm, too. What can you see inside the earthworm? What does it remind you of? Look for the heart and blood vessel. Look for the pulse, indicated by the vessel alternately swelling and contracting. Which direction is the blood flowing? How could you take an earthworm's pulse?
- Find the anterior or head end, which is more pointed and narrow. You can also place the worm on a rough piece of paper and see which direction it travels. The head end usually goes forward first.
- On the head end of the worm, find the clitellum, a whitish, swollen band that looks like a collar around the worm's middle.
- Count the segments from the head/mouth to the clitellum. This number is different in different species, so counting segments can help you decide whether your worms are of different species.
- Look for the hair-like bristles called setae around or under the worm's body. Worms use their setae to help them crawl and to grip and anchor themselves firmly in the ground. (That's why you see robins tugging to get worms out of the soil!) Are setae paired? How are they spaced around the body? What differences in setae patterns do you see?
- Look at the worm's shape. Is it cylindrical or flattened?
- Look at the top (dorsal) and belly (ventral) side. Try turning the worm over. What happens?
- Notice the worm's color: brownish, reddish, or gray-blue, pale white, or white. Pigmented (colored) worm species live and feed at or near the surface of the soil in organic matter such as leaf litter or compost piles, but they may also burrow very deeply. Nonpigmented worms live and feed in the soil, not at the surface. The litter-dwelling species help the soil-dwelling species because they work the organic matter into the soil where the soil-dwellers can eat it.
- Compare the worm's movements on wet and dry surfaces and its response to water, touch, and darkness/light. What did you observe? What conclusions or hypotheses can you draw? What questions do you have?
After you study and compare the worms, place them where they can safely get back into the soil.
After Observing Worms
-
Ask a student volunteer or the teacher draw a large, simple outline of a worm on the chalkboard. Take turns and drawing, labeling, or making notes near the drawing to record your observations. The drawing can show the segments, clitellum, anterior and posterior ends, the heart and blood vessel, and setae. This diagram may help you.
-
As a class, discuss how the earthworm's various structures and behaviors help it to survive in its underground home. After discussing the observations, the teacher should introduce the term adaptation and help students define it (the characteristics and behaviors of an organism that help it to survive in its environment).
-
Investigate more about earthworms with these excellent Web sites:
National Science Education Standards
-
Plan and conduct a simple investigation.
-
Each plant or animal has different structures that serve different functions in growth, survival, reproduction.
-
Living systems at all levels of organization demonstrate the complementary nature of structure and function.
-
An organism's behavior evolves through adaptation to its environment.
© 1997 – 2025 Journey North. All rights reserved.![]()
![]()