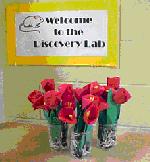
Tulip Models: Making Blooming Tulips in the Classroom
 |
| Tulips
made by students at Irwin Math/Science Magnet Elementary School
in Fort Wayne, IN |
Try this
neat creative projects from students at Irwin Math/Science Magnet Elementary
School in Fort Wayne, IN. Create a model of the entire tulip plant. Create
a model of the entire tulip plant. Materials should be easily available.
Use a small balloon for the bulb, shredded packing material - the roots
(taped to the bulb), straws - for stem, green paper - leaves, yellow pipe
cleaners - anthers and stigmas, and finally, red paper folded into an
Origami paper cup for the flower.
Irwin students wanted to share this fun project with all the rest of the
Journey North Tulip Study participants. Thank You!
Making the Tulip Models
Materials:
-
5” round balloon – burgundy (the brown ones look black)
- Straws
- 5” X 8” piece of green paper (25-30 lb.)
- 6” square of red paper (25-30 lb.)
- 4” piece of yellow pipe cleaner
- Crinkle paper (for gift packaging)
- Clear tape
- Stapler and staples
- Scissors
Assembly:
- Cut two oblong, pointed leaves from the green paper. (You could draw them ahead and copy the outlines onto the green paper. 4 leaves should fit on letter size paper.)
- Roll the base of the leaves around one end of the straw. Fasten with clear tape. Insert that end into the open end of the balloon and staple through all layers.
- Tape a small amount of the crinkle paper to the bottom of the balloon.
- Fold
the red paper into an origami paper cup.
Step 1: Fold diagonally corner to corner keeping the fold at the bottom, point up.

 Step 1Step 2Step 3
Step 2: Bring the outer corners up and touch them to the opposite side. Fold them on top of each other overlapping and matching the top edges. The result will be narrow at the bottom and slightly wider at the top.
Step 3: Fold the remaining triangle of paper at the top forward and the other side toward the back. - Snip a small cut into the bottom of the paper cup and slip it over the top end of the straw, opening the cup and pressing it together at the base.
- Fold the pipe cleaner in half and insert it into the top of the straw in the middle of the paper cup.
- Staple all three layers together – the paper cup, the straw, and the pipe cleaner.
- Adjust the shape of the flower as needed.
Created and shared by Kim Grant & Christine Michael, Irwin Math/Science Magnet Elementary, Fort Wayne, IN.


